
Feed your Data Lake with Data Factory
 A while back I came across a case where there was a need to gather data from multiple sources in one place, with the purpose to create reports from that data. For me this was a new area to explore since I haven’t worked that much with data stores and data collection. The selected design was to use Data Factory as the engine that collected the data from different APIs and Data Lake as the target to store collected data for the report tool to collect from. So let’s have a look at the design.
Design

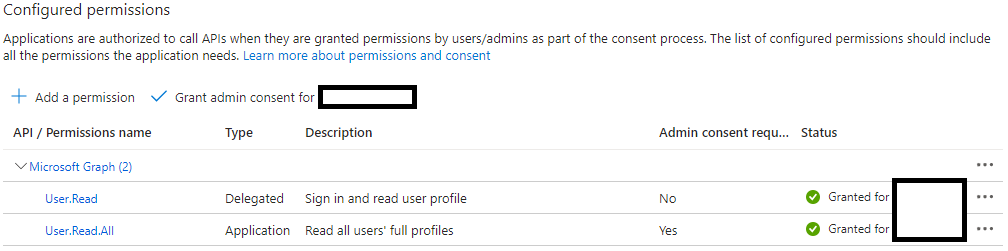
The App registration is used in Data Factory to authenticate to Graph API, and in this case we are going to collect user data from Entra ID using Graph API so we need to grant the App registration API permission to read all users.
The Key Vault will be used to store secrets and IDs that we will use within the Azure Date Factory. This is to avoid hard-coded secrets and IDs in our solution and it will ease the process of updating secrets when they expire.
The Data Factory will be the engine that calls the APIs and in that call can perform the first filter on the data and the copies that data in to our Data Lake.
The Data Lake is the place where all raw data is stored. As the solution expands data from multiple sources will be pulled in to the Data Lake.
Creating Azure Resources
Start by creating an App registration and grant it Application permissions for User.Read.All on Microsoft Graph API. This permission requires admin consent. We also need to generate a secret for the App registration, copy the secret because once we leave that blade we won’t be able to see it again. Before we leave the App registration we also need to get the Application (client) ID and the Tenant ID. These three values will be stored in the Key Vault.
Next step is therefore to create a Key Vault. When creating the Key Vault, make sure that the Permission model is set to Azure role-based access control. It’s the recommended setting and in this case a requirement since we will use a System Assigned Managed Identity for Data Factory to authenticate to Key Vault. Once created add three secrets:
- Application ID
- Application Secret
- Tenant ID
Now we can create a Data Factory. The process is pretty straight forward, in this scenario we can go with the classic Microsoft next, next, finish approach. The magic till happen once we move in to the Azure Data Factory Studio.
Before we can move in to the studio we need to create a Data Lake. This is a fancy name for a Storage Account where you have Enabled hierarchical namespace. This is configured under the Advanced tab when creating a Storage Account. Under this tab we also want to check the box Default to Microsoft Entra authorization in the Azure portal so we can grant access to the Data Lake using Azure role-based access control (RBAC). In this scenario we will also create a container in the Data Lake called raw where we will store the data that is sent from Data Factory. (This container can be named whatever you want.)
One final touch before we jump in to Azure Data Factory Studio, and that is to assign roles to the System Assigned Managed Identity for Data Factory so that it can perform operations on both Key Vault and Data Lake. We can set this on various scopes, but in this case I have created all resources in the same Resource Group so I will assign it on the Resource Group scope.
- Key Vault Secrets User
- Storage Blob Data Contributor
There are multiple RBAC roles that will work for this, but Data Factory needs to be able to read the secrets in the Key Vault and be able to Write to the Data Lake. Keep in mind to use the concept of least privileged.
Data Factory configuration
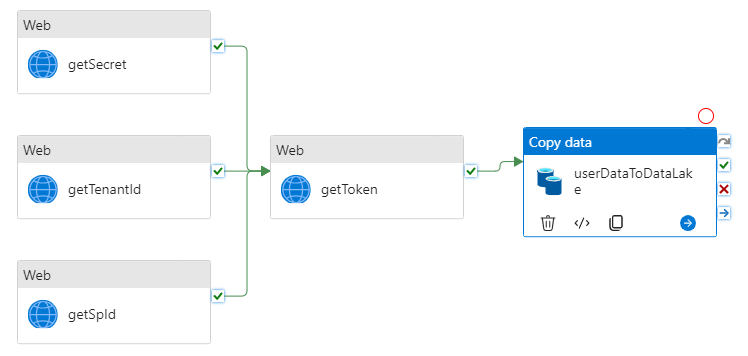
Once we are done in Azure Data Factory Studio we will have a pipeline that looks like the one above.
First we will start by creating two Linked services, one for Graph API and one for Azure Data Lake Storage Gen2. This is done under the Manage blade.
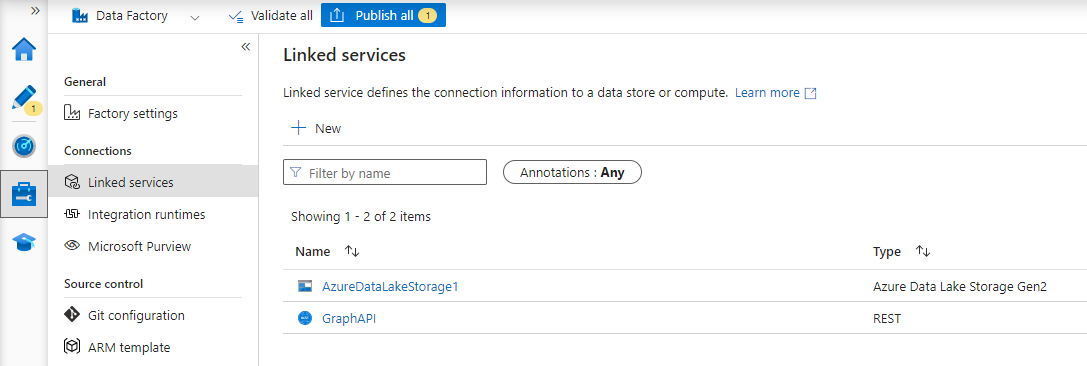
For Graph API, klick New and select REST from the list of services. Give it a good name, i.e. GraphAPI, set the base URL to https://graph.microsoft.com/ and configure Authentication type as Anonymous. Hit Save.
Klick on New again and this time select Azure Data Lake Storage Gen2 in the list of Services. Configure Authentication type as System Assigned Manage Identity. We can use the Account selection method: From Azure Subscription and find our Data Lake using the drop down menus. Hit Save.
Next step is to move to the Author blade where we will by creating two Datasets before we start building our pipeline.
The first dataset is for Graph API. To start klick on the three dots behind Datasets and select New dataset and choose REST from the list. Give it a good name and then select the GraphAPI linked service that we just created from the dropdown menu. We need to do some more configurations on the GraphAPI dataset, so select it in the list and go to the parameters tab. Add a parameter with:
- Name endpoint
- Type string
Leave Default value blank. Go back to the Connection blade and add the Relative URL: @dataset().endpoint.
Now we will create a dataset for the export of user data. Klick New dataset again and this time select Azure Data Lake Storage Gen2, hit continue and in the next view select JSON. Give it a good name and select the linked service for our Data Lake in the dropdown menu. The only configuration we will do on this dataset is to the File path where we will add raw in the box called File system and users.json in the box called File name.
Now we can create a new Pipeline where we will pull all this together. Start by creating a new pipeline and give it a good name. The first boxes we will add to our Pipeline are three Web boxes that will fetch values from Key Vault so we can reference them when we collect our token.
IMPORTANT: Checking the boxes for secure input and secure output is important. This will remove the input and output of the box from the logs, and we are working with secrets and tokens in this example so we don’t want that to be presented in the logs as plain text.
Under the Configuration blade we need to add the following configuration:
- URL: https://KEYVAULTNAME.vault.azure.net/secrets/SECRETNAMEt?api-version=7.0
- Method: GET
- Authentication: System Assigned Managed Identity
- Resource: https://vault.azure.net
- Use the same Settings for all three of the web boxes that will collect secrets from Key Vault but replace SECRETNAME with the name of each secret.
Create a new web box for collecting a token and connect the three previous web boxes with the on success connection. Once again under General we will check the boxes for Secure output and Secure input. Continue to the Settings blade and add the following configuration:
- URL: https://login.microsoftonline.com/@{activity(‘getTenantId’).output.value}/oauth2/v2.0/token
- This is where we reference the previous box for Tenant ID so that we can use the value it collected from Key Vault without adding this as hard-coded values in our Data Factory.
- Method: Post
- Body: grant_type=client_credentials&client_id=@{activity(‘getSpId’).output.value}&client_secret=@{activity(‘getSecret’).output.value}&scope=https://graph.microsoft.com/.default
- This is where we reference the previous boxes for the App Secret and App ID so that we can use the values they collected from Key Vault without adding this as hard-coded values in our Data Factory.
- Authentication: None
- Headers:
- Name: content-type
- Value: application/x-www-form-urlencoded
Finally we will add the Copy data box. This box will make tha API call to get the user data from Entra ID and copy the response to our Data Lake as a JSON. Under General we will give the box a name, and for this box we will only check the box for Secure input since the input contains our token. Under the Source tab we will configure the API call to Microsoft Graph to collect user data from Entra ID, and in this example we will do a first filtering of data in out API call. Configure the source tab with the following parameters:
- Source dataset: Select the dataset GraphAPI that we created earlier.
- Dataset properties
- Name: endpoint
- Value: v1.0/users?$select=displayName,givenName,surName,id,userPrincipalName,mail
- Here we will select only a few properties to be returned for each user.
- Request method: GET
- Additional headers:
- Name: authorization
- Value: Bearer @{activity(‘getToken’).output.access_token}
- Pagination Rules:
- Name: AbsoluteUrl
- Value: Body [‘@odata.nextLink’]
Under the tab Sink we will configure the location that the output from the API call will be copied to. The only parameter we need to set here is:
- Sink dataset: userData This refers to the dataset that we created earlier where we specified both location and name of the JSON file in the Data Lake for storing copied user data.
Now we can hit debug and verify that the pipeline runs successfully. After the debugging is complete you can navigate to the Data Lake in the Azure portal and you will find a file called users.json under the raw container.
NOTE: If you don’t publish the changes you have made, these wont be saved. If you close your browser tab without publishing everything that you have made since the last publish will be lost.
We now have a basic solution that will copy user data from Entra ID to a Data Lake with API calls to Microsoft Graph orchestrated in Data Factory. We can now build on this solution by adding more API calls or data sources to fill our Data Lake with more data. This data can then be used to create reports or perform analytics on.