
Add certificates to Application Gateway with PowerShell

Problem in the Azure portal
If you are publishing your applications publicly, you are probably protecting them with a Web Application Firewall (WAF). In most cases I deploy an Application Gateway and attache a Web Application Firewall Policy to it to protect the applications that I want to publish to the internet. When you want to reach your application over HTTPS you need to upload a TLS certificate to encrypt your traffic. This is then used in the Listener within the Application Gateway. These certificates can be stored in an Azure Key Vault so that they can be reached either from the portal or programmatically. You can use the portal to browse through certificates that has been uploaded to your Azure Key Vault when you are configuring the Listener for your Application Gateway, but that only works if you have configured the Azure Key Vault to use access policies instead of Role-Based Access Control (RBAC), and using RBAC is the recommended way to manage Azure Key Vault access. Using RBAC requires that we have a Managed Identity assigned to the Application Gateway that we then assign a RBAC-role to that allows it to access the certificates in the Azure Key Vault. If we try to browse certificates in the Azure Key Vault when we have RBAC configured as the access model we run in to this message:
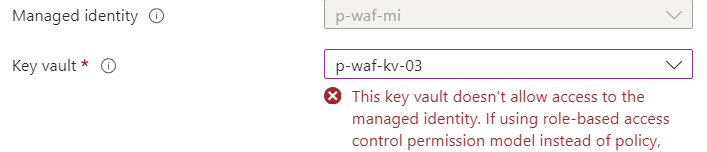
It tells us that we can’t access the Azure Key Vault because it’s using the RBAC permission model. But that is just through the portal, we can still reach our goal by using Powershell to upload the stored certificate to the Application Gateway as a Listener TLS certificate.
Solution with PowerShell
First you need to upload the certificate you intend to use in the Application Gateway to the Azure Key Vault. For this post I generated a certificate from the Azure Key Vault for demo purposes.

To upload this certificate as a listener TLS certificate in the Application Gateway you can use the cmdlets below.
Connect-AzAccount -TenantId <TENANT ID> -AuthScope AzureKeyVaultServiceEndpointResourceId
$appgw = Get-AzApplicationGateway -Name <APPLICATION GATEWAY NAME> -ResourceGroupName <RESOURCE GROUP NAME>
Set-AzApplicationGatewayIdentity -ApplicationGateway $appgw -UserAssignedIdentityId <MANAGED IDENTITY RESOURCE ID>
$secret = Get-AzKeyVaultSecret -VaultName <KEY VAULT NAME> -Name <CERTIFICATE NAME>
$secretId = $secret.Id.Replace($secret.Version, "")
Add-AzApplicationGatewaySslCertificate -KeyVaultSecretId $secretId -ApplicationGateway $appgw -Name $secret.Name
Set-AzApplicationGateway -ApplicationGateway $appgw
Start with connecting to Azure using the AuthScope AzureKeyVaultServiceEndpointResourceId so that the managed identity can be used. Then we will then specify the the Application Gateway that we want the certificate to be uploaded to. Specify the managed identity that is associated to the Application Gateway and has access to read the certificates in the Azure Key Vault. Then we need to get the secret ID, and to do that we need to specify the Key Vault and certificate names. When creating the variable for $secretID we can remove the secret version from the command to use the latest version. Then we need to add the certificate to the Application Gateway before finally committing the changes to the Application Gateway.
When you have completed these steps you will find the certificate under Listener TLS certificates, as shown in the image.

This will allow you to select an existing certificate when creating a new listener, and the uploaded certificate will appear in the drop-down menu.